
If your team uses Smartsheet to collaborate on and manage lots of projects, you often need to create a consolidated timeline that reports on all of your multiple projects at once:

To build your own multi-project timeline from Smartsheet, download a free trial and follow either set of instructions below:
1. Easy Method: Direct import of Smartsheet data
2. Legacy Method: Import of Smartsheet data through Excel
Direct Smartsheet Method
OnePager connects directly to Smartsheet's collaborative work management (CWM) platform, and imports multiple projects all at once. Here's how to create a multi-project timeline from Smartsheet:
- Here is a quick look at one of the Smartsheet projects that we want to include in our timeline. In this example, we're going to create a high-level timeline, so will tell OnePager to only bring in summary tasks, which doesn't require any special setup in Smartsheet ahead of time:

On the other hand, if you want to bring in a different set of rows from Smartsheet besides just the summary tasks, you can add a checkbox field to Smartsheet called OnePager and use that as the basis for filtering instead.
-
Now, go to your desktop or Windows Start menu, and launch OnePager:

-
On the OnePager start screen, choose New to start building a new multi-project timeline from Smartsheet:

-
On the import wizard, choose Select > BROWSE Smartsheet:

-
If you've never logged into Smartsheet from OnePager before, Smartsheet will ask you for your username and password:

After logging in, Smartsheet will ask you if you want to Allow OnePager to access your Smartsheet data. Once you choose Allow, OnePager will connect to Smartsheet automatically in the future.
-
Holding down the Ctrl key on your keyboard, select all of the Smartsheet projects that you want to import. Once you have selected all of the projects that you need from Smartsheet, click OK:

Here, we are importing three Smartsheet projects into our timeline.
-
Once all of your Smartsheet projects are selected, tell OnePager to filter your Smartsheet project based on the Summary field, or the OnePager checkbox field if you're using it, and then click Next:

Here, we are using OnePager's Multi-Project Timeline for Smartsheet template, which is specifically built for multi-project timelines from Smartsheet. This is one of our standard templates that comes with your OnePager license, but you are welcome to use your own custom template if you prefer.
-
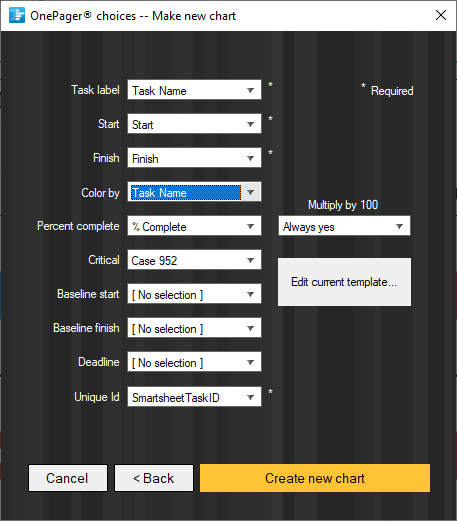
Double-check that the Smartsheet columns OnePager has selected are the ones that you want to use. Here, we've decided to color-code the timeline based on the Task Name field, which means that the same phase will have the same color across multiple Smartsheet projects:
-
Finally, click on Create New Chart. OnePager will import the selected rows from all three Smartsheet projects and create a multi-project timeline that looks something like this:

The example above includes a few minor formatting adjustments, like changing the font size, customizing the shapes of the task bars, and adding a drop shadow. Once you create your chart in OnePager, you can apply the same types of customizations very easily by going to Home > Chart Properties > Task Bars. Download a free trial to try it with your own Smartsheet projects.
15-DayFree Trial
Excel Method
OnePager Express can take multiple Excel exports from Smartsheet (one per project), and combine them into a multi-project timeline that summarizes everything in one place. Here are the steps:
Log into Smartsheet and open your first project plan, which in this case is called the "Alpha Project". We recommend including Smartsheet's Row ID column. To do this, right-click on any existing column in Smartsheet, then choose Insert Column Left:

On the Insert Column screen, pick Auto-Number/System for Row ID:

Before clicking OK, we want to make sure that the Row ID is not going to repeat between any of your other projects. Usually Smartsheet uses a simple number for the Row ID, but that can be a problem since the same number can appear in multiple projects. To make the Row ID unique, add your project name as a prefix. This way instead of having a Row ID of "007", it will be "Alpha-007" instead. This makes it much easier to combine several Smartsheet projects into a Multi-Project Timeline later.
Click OK and save your Smartsheet project to see the Row ID values::

We will create a timeline for each subproject, which means we want to have a Project Name column that clearly states which Smartsheet project each task belongs to. To do this, right-click again on any existing Smartsheet field and insert another new column. This time, it will be a Text/Number column called Project Name:

Once the Project Name column has been inserted, you can add the project name ("Alpha" in this case) to every row in your plan by filling down.
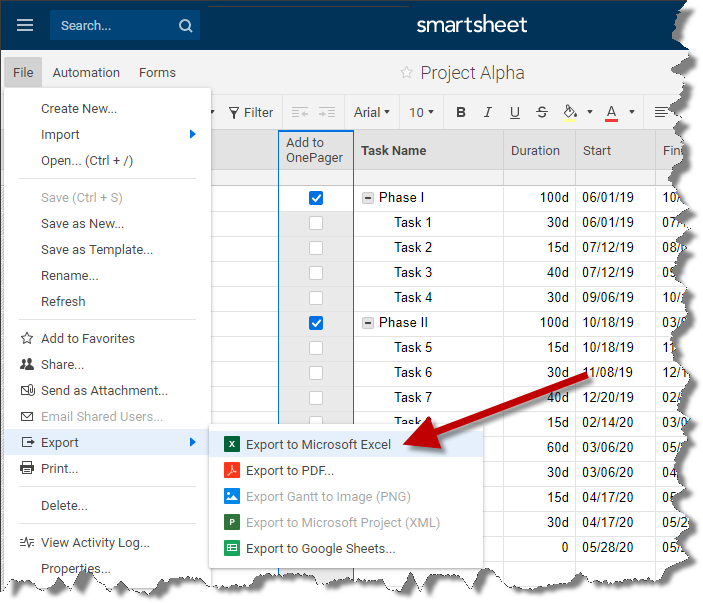
In this example, we're going to create a high-level timeline that only displays the phases of each subproject, so we don't want to include all of the child rows in our report. To pick some Smartsheet rows but not others, insert a Checkbox column into Smartsheet called Add to OnePager and then select only the parent rows, like this:

The first project, "Project Alpha", is ready to export from Smartsheet into Excel. Go to File > Export > Export to Microsoft Excel:
Before building your multi-project timeline, repeat these first few steps for all of your other Smartsheet projects that you want to include in your report. In this example, we have a total of three projects: Alpha, Beta, and Gamma. So, we want to insert the same fields into the Beta and Gamma projects before exporting all three to Excel:

Here, we see all three Smartsheet project plans exported to separate Excel files in the same folder:

You don't have to place all of your Smartsheet exports in the same folder, but it can be more convenient this way.
- Open the first Excel file, which is for "Project Alpha", and then go to Excel's Add-Ins tab. Click the the OnePager Express button:

When OnePager's start screen appears, click NEW to build a new Multi-Project Timeline.
- In the import wizard, "Project Alpha" has already been imported, since that's what was already open in Excel. To add the rest of the Smartsheet projects, click on Add/Remove:
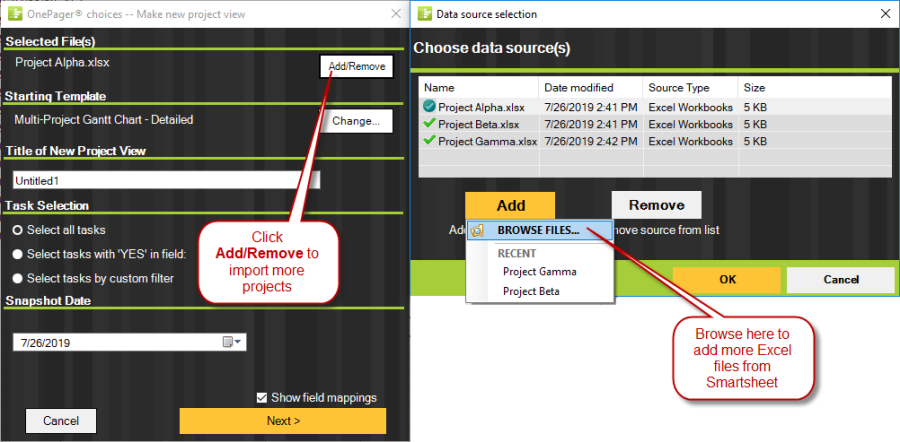
When the Data Source Selection window pops up, click Add and then BROWSE FILES to attach as many more Smartsheet projects as you'd like. OnePager lets you import an unlimited number of project plans.
When you've added all of the Smartsheet projects that you need to, just click OK.
- Back in the import wizard, give your timeline a name and then pick the Add to OnePager checkbox field that you set up as a filter back in Smartsheet. This will tell OnePager to bring in your parent rows from Smartsheet, but not to import the child rows.

- Click Next and double-check which columns from Smartsheet you want to use in your OnePager timeline. It's important for OnePager's Unique ID to be mapped to Smartsheet's "Row ID". We've also chosen to assign a different color to each phase of each project so that all "Phase I" parent rows are one color, all "Phase II" are a second color, and so on.

When you're ready, click Create New Chart to build your timeline.
- OnePager will import the parent rows from all three Smartsheet projects automatically. Initially, your chart will look like this::

This is a nice summary, but it would be more useful if all of the phases for each project were lined up left-to-right in more of a timeline format.
- To create a timeline layout where each project's key phases are lined up left-to-right, go to Home > Chart Properties > Rows/Swimlanes. Instead of making a Gantt Chart, choose the Timeline option, which will place multiple tasks into the same row based on the Project Name field from Smartsheet:

In addition, we can turn on a Swimlane based on the same Project Name field so that the project names appear in a column on the left-hand side of the chart.
- Click OK, and OnePager will automatically change your report from a Gantt chart layout into a timeline layout with one row for each Smartsheet project, and all key phases lined up in sequence:

We've also added a drop shadow, and assigned a unique color to each phase, so all "Phase I" tasks are blue, all "Phase II" tasks are red, and all "Phase III" tasks are green, even though they all come from different Smartsheet project plans.
Build your Smartsheet Multi-Project Timeline today by downloading a free trial of OnePager Express.
15-DayFree Trial
Last Updated: June 21, 2024